Would you like to learn how your WordPress website will handle a sudden increase in traffic? Stress testing can help you evaluate your website’s performance under various conditions, allowing you to identify and address any issues that may arise.
In this article, we will guide you through the process of stress testing your WordPress website.
What Is a WordPress Stress Test?
A WordPress stress test is a crucial tool for website owners to ensure their site can handle high levels of traffic. By simulating extreme conditions, you can identify any weaknesses in your website’s performance and make necessary adjustments to improve its stability and speed.
While your hosting plan may dictate the amount of traffic your site can handle, stress testing can help you push those limits and uncover any potential issues. For example, you may discover that certain plugins or themes are not optimized for high traffic, causing your site to crash or slow down.
By conducting a stress test, you can identify and address these issues before they impact your users’ experience. This will help you provide a better user experience and ensure your site is prepared for any spikes in traffic.
To conduct a stress test on your WordPress website, there are various tools and services available. These include load testing plugins, online stress testing services, and manual testing methods. By choosing the right method for your needs, you can ensure your site is ready to handle any level of traffic.
Stress Testing a WordPress Website
By using a stress test, you can determine how your website will handle a sudden surge in traffic and identify any issues that may arise. This can include finding out which plugins, themes, code snippets, or images may malfunction under extreme conditions.
Stress testing your website can help you optimize your site for better performance and ensure that it can handle high-traffic situations. By identifying and fixing any issues, you can provide a better user experience and avoid potential downtime.
In this tutorial, we will show you how to stress test your WordPress website using Loader.io, a free tool that simulates high-traffic situations and performs a series of tests.
Sign Up for a Free Loader.io Account
To begin using Loader.io, the first step is to visit their website and create a free account. You can do this by clicking on the ‘Sign Up Now’ button, which will take you to the registration page.

Once you reach this stage, you will be presented with a variety of pricing plans to choose from.
Simply select the ‘Free’ pricing plan to proceed.

After filling in your company name, email address, and password, you will need to verify that you are not a robot by checking the reCaptcha box.
Once you have completed this step, click the ‘Sign Up’ button to create your new account.

Adding a New Host to Loader.io
Once you have completed the previous step, you can proceed to set up a target host by simply clicking on the ‘+ New Host’ button.
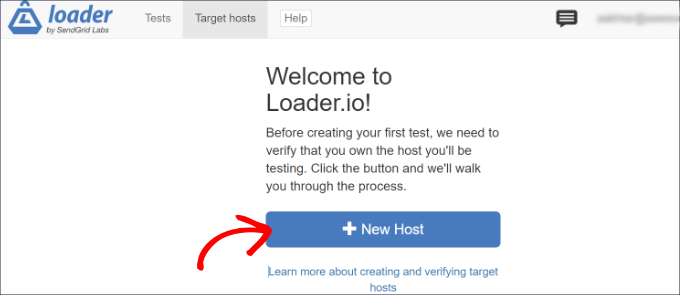
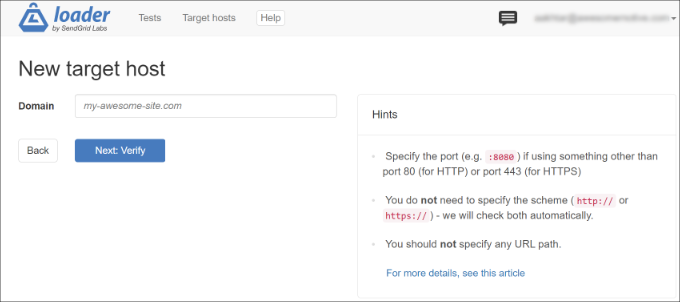
After entering your domain name, click on the ‘Next: Verify’ button to proceed.
After downloading the verification file, you will need to upload it to your website’s root directory. This can be done using an FTP client or through your web hosting control panel.
Once the file has been uploaded, go back to the Google Search Console and click the ‘Verify’ button. Google will then check for the verification file on your website and if it is found, your domain will be verified.
If you encounter any issues during the verification process, you can refer to Google’s documentation or seek assistance from your web hosting provider.
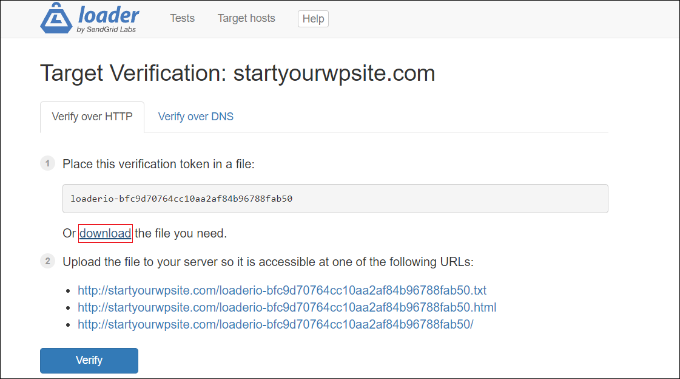
Once you have downloaded the file, the next step is to upload it to the root folder of your website, which is typically referred to as the ‘public_html’ folder.
To accomplish this, you can make use of an FTP client.
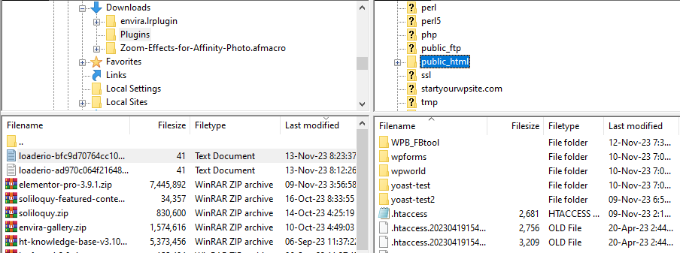
After uploading the file, simply navigate back to the Loader.io website and click on the ‘Verify’ button.
Once the verification process is complete, you will receive a success message indicating that the file has been successfully verified.
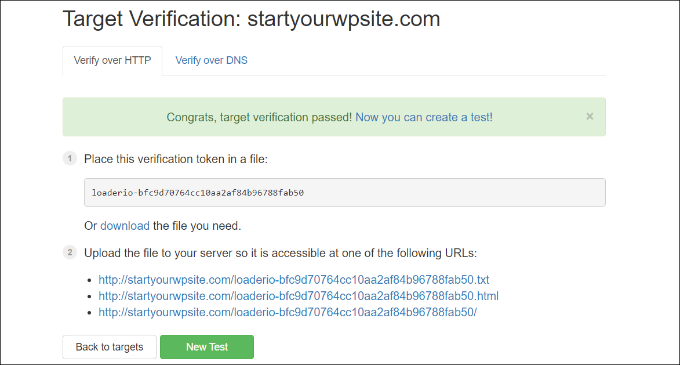
After verifying the uploaded file, navigate back to the Loader.io website and click on the ‘New Test’ button. From there, you can set up a stress test for your website.
Configuring Your Stress Test Settings
You have the option to modify the parameters of your stress test. To begin, you can assign a name to your test.
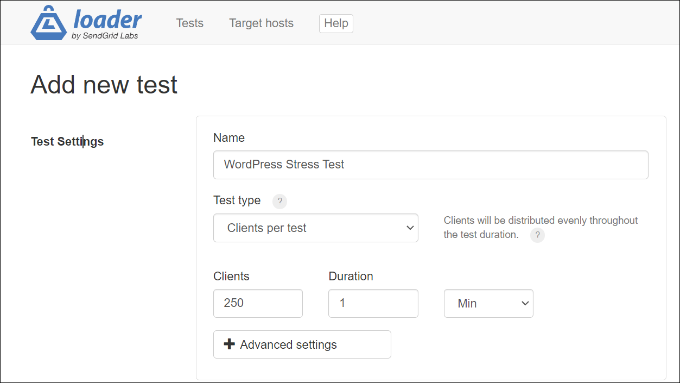
Once you’ve set up your account, the next step is to select the type of test you want to run. Loader.io offers three different test types:
1. Clients per test – This test allows you to simulate a specific number of visitors to your site over a set period of time. You can choose the number of clients and the duration of the test.
2. Clients per second – This test measures your site’s performance under a specified number of client requests per second.
3. Maintain client load – This test type maintains a constant number of clients throughout the duration of the test. It’s designed to stress test your site under a consistent load for a specific period of time.
To ensure thorough testing of your site, we suggest conducting multiple tests using each of the testing types available. This approach will help identify any potential issues that your site may face under different scenarios.
As you scroll down, you will come across the Client Requests settings. For general testing purposes, we recommend sticking to the default settings and not making any changes.
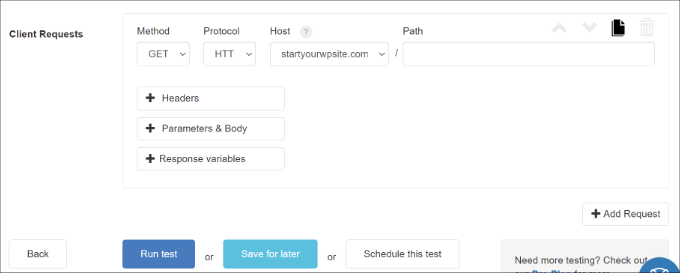
Now, it’s time to put your WordPress site to the test. Click on the ‘Run test’ button to initiate the stress test.
Analyze Your Stress Test Results
Loader.io is a tool that can help you run stress tests on your website and provide you with the results. By analyzing these results, you can gain insights into how your website performs under high-traffic situations.
One of the key metrics to look at is the average response time. A lower response time indicates that your website loads faster. In our testing, we found that the average response time was 590 milliseconds or 0.59 seconds when 250 clients visited the site for 1 minute.

However, it’s also important to look at the maximum response time, which indicates the slowest loading time experienced during the test. In our case, the maximum response time was 10.489 seconds, which is quite high. By examining the graph below, you can see when the response time spiked in relation to the number of clients.
Our testing revealed that there was a significant spike in response time when the number of clients exceeded 150, and the maximum response time occurred when the number of clients almost reached 200. This information can help you identify potential bottlenecks in your website’s performance and take steps to address them.
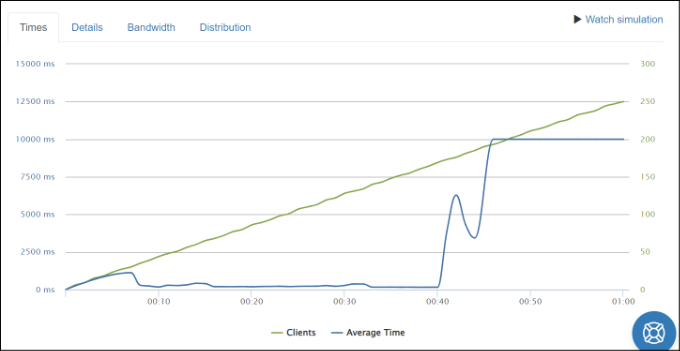
This will help you identify any potential bottlenecks and optimize your website for better performance under high traffic.
Overall, it’s important to regularly test your website’s performance to ensure that it can handle high traffic and provide a smooth user experience. By doing so, you can avoid losing potential customers due to slow loading times or other performance issues.
Tips to Improve Response Time & Boost Performance
To improve response time and handle high traffic load, consider the following tips:
1. Upgrade Your WordPress Hosting Plan – If your current hosting plan has limits on the number of visitors per month, consider upgrading to a higher plan with more server resources to handle spikes in traffic.
2. Use a Caching Plugin – A caching plugin reduces server load and improves performance by serving a static version of your site to users instead of processing a new request for each page. This results in faster load times and a better user experience.
3. Set Up a Content Delivery Network (CDN) – A CDN delivers cached static content to users based on their location, reducing server load and improving response time.
4. Optimize Your Images and Videos – Large, unoptimized images and videos can slow down your site and increase server load. Compress large image files and consider hosting videos on YouTube or Vimeo and embedding them in your content.
5. Remove Unused Plugins and Themes – Unused or resource-heavy plugins and themes can slow down your site by loading unused scripts and using up server resources. Remove them to improve performance.