Do you want to customize the header, footer, or sidebar for each category on your WordPress website?
Typically, the same header, footer, and sidebar are displayed across your entire site. However, you may want to showcase distinct information, colors, or widgets for specific categories.
In this guide, we will demonstrate how to effortlessly incorporate a personalized header, footer, or sidebar for each WordPress category.
Why Add Custom Header, Footer, or Sidebar for Each Category?
When you create a WordPress website, you’ll likely customize the header, footer, and sidebar to help visitors navigate your site and find the content they’re interested in. However, most themes display the same header, footer, and sidebar on all posts, pages, categories, and archive pages.
Fortunately, there are times when you may want to display a different header, footer, or sidebar on your site. For instance, you might want to show a unique sidebar for each custom post or page in WordPress. Alternatively, you may want to alter the appearance of your website for specific categories by displaying a custom header, footer, or sidebar. For example, you could showcase recent posts from a particular category in a custom sidebar.
In this article, we’ll explore three methods for easily adding a custom header, footer, or sidebar for each category in WordPress.
Method 1: Adding Custom Sidebars for Each Category Using a Plugin
If you are satisfied with your website’s design and only want to modify its sidebars, this method is ideal for you. It is also beginner-friendly and straightforward.
To begin, you must install and activate the Easy Custom Sidebars plugin. For a more detailed explanation, refer to our guide on how to install a WordPress plugin.
After activation, navigate to the Appearance » Sidebar Replacements page to generate a custom sidebar.
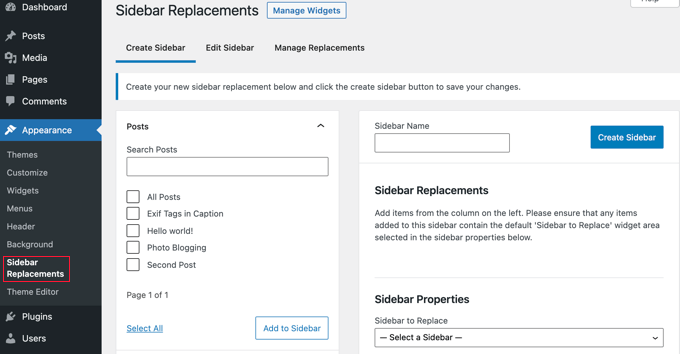
Next, you will need to choose the location where you want to display the new sidebar. You can select from various options such as the entire site, specific pages, or posts.
Once you have selected the location, you can start adding widgets to your new sidebar. You can choose from a variety of widgets such as recent posts, categories, archives, and more.
Finally, don’t forget to save your changes and preview your site to ensure that the new sidebar is displaying correctly.
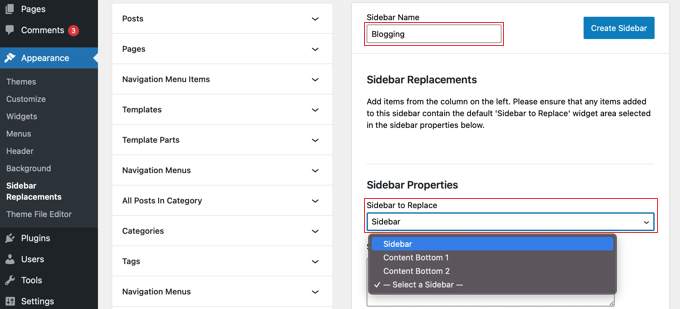
To continue, you’ll need to choose when the custom sidebar will appear. On the left-hand side of the screen, you’ll see a list of your pages, posts, categories, and tags. Click on the arrow next to Categories and select the Blogging category by checking the box next to it. Then, click on the ‘Add to Sidebar’ button to add the custom sidebar to your website.
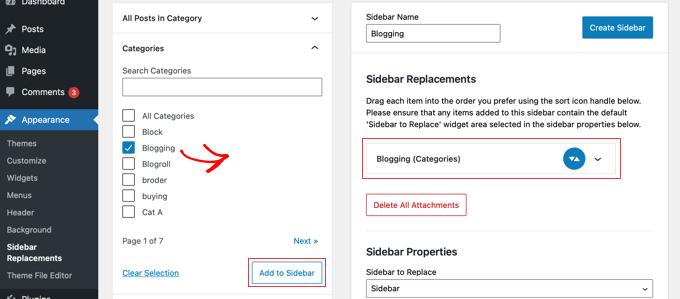
After selecting the Blogging category in the Sidebar Replacements section, you will notice that the sidebar now appears on that category page. If you want to add the sidebar to multiple categories, you can do so easily.
To create your first custom sidebar, simply click the ‘Create Sidebar’ button. Once you have created your custom sidebar, your next task is to add WordPress widgets to it. You can learn how to do this by following our guide on adding WordPress sidebar widgets.
With Easy Custom Sidebar, you can create as many custom sidebars as you need and assign each one to different category pages on your WordPress site. This gives you the flexibility to display relevant content and information to your visitors based on the category they are browsing.
Method 2: Adding Custom Header or Footer for Each Category Using a Theme Builder
With SeedProd, you can also create custom page templates, landing pages, and even maintenance mode pages. It’s perfect for those who want to create a professional-looking website without the hassle of coding.
To get started with SeedProd, simply install and activate the plugin. Then, go to the SeedProd dashboard and start customizing your website’s design.
With SeedProd, you can easily add custom sidebars to your website by using the drag-and-drop interface. You can also add widgets, images, and other elements to your sidebar to make it more functional and visually appealing.
Overall, if you want to take your website design to the next level, we highly recommend using SeedProd. It’s easy to use, flexible, and gives you complete control over your website’s design.
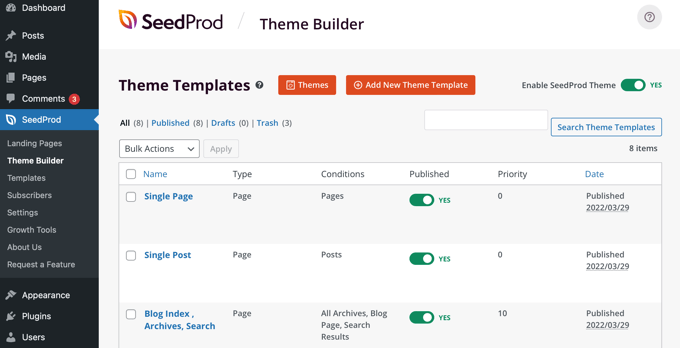
Next, you can customize your footer by adding widgets, text, or images. You can use the drag-and-drop interface to add and arrange widgets, or you can use HTML and CSS to create a more customized design.
Once you’ve created your custom footer, you can set up rules to determine when it is displayed. For example, you might want to display your custom footer only on blog posts or only on pages with a certain category.
To set up rules, click the ‘Display Rules’ tab and then click the ‘Add New Rule’ button. You can then choose from a variety of options, such as page type, category, or user role, to determine when your custom footer is displayed.
Overall, SeedProd is an excellent tool for creating custom WordPress themes and designing unique headers, footers, and sidebars. With its intuitive interface and powerful features, you can easily create a professional-looking website without any coding knowledge.
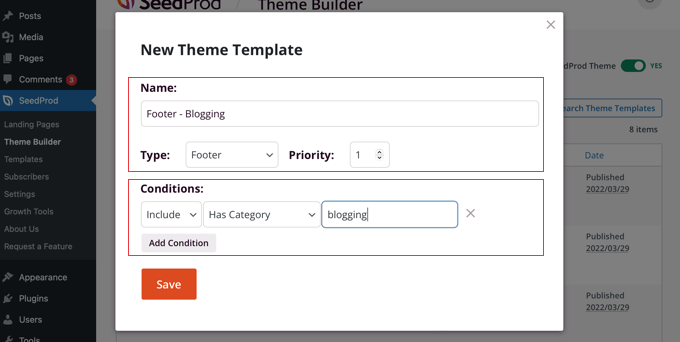
Next, you’ll want to customize the duplicated footer to fit your needs. You can change the text, add images or links, and adjust the layout to your liking. Once you’re done, make sure to save your changes.
Finally, you’ll need to set the conditions for when the duplicated footer will be displayed. You can do this by following the same steps as before, but instead of selecting ‘Has Category’, you can choose from a variety of other options such as ‘Has Tag’, ‘Is Page’, or ‘Is Home’.
By creating custom footers and setting specific conditions for when they’re displayed, you can provide a more personalized and targeted experience for your website visitors.

To customize the new footer, you can use SeedProd’s intuitive drag-and-drop editor. This allows you to easily add or remove elements, change colors and fonts, and adjust the layout to your liking. Once you’re happy with your changes, simply save the new footer and it will be applied to your website according to the conditions you set earlier. With this feature, you can create multiple footers for different pages or sections of your website, giving you greater flexibility and control over your site’s design.
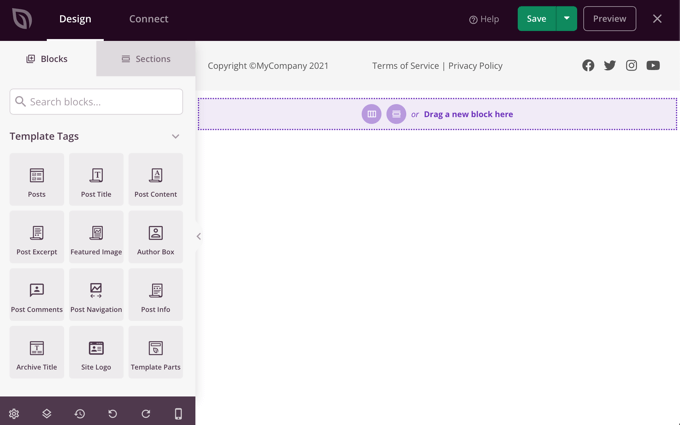
With SeedProd, customizing your footer is a breeze. You can effortlessly add new blocks or modify existing ones by adjusting their color, text, and other settings.
For the purpose of this guide, we’ll keep things simple and change the background color to a refreshing shade of green.
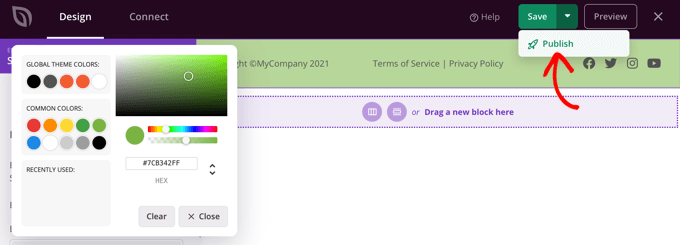
Once you are satisfied with your custom header, remember to click the down arrow next to ‘Save’ and then click ‘Publish’ to save your changes and make the header live.
Great job! Your new header will be visible when viewing the designated category archive page and also when viewing posts in that category.
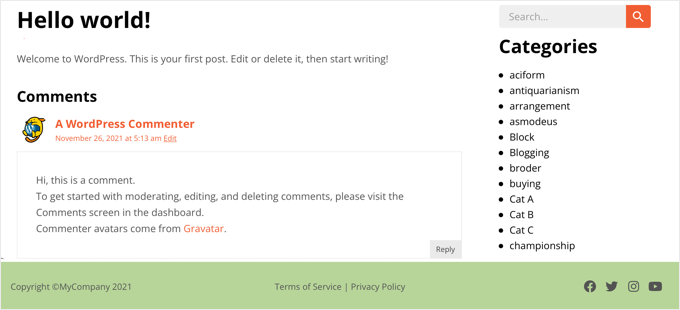
Here’s an example of how it will look when viewing a post in the designated category with your custom header.
Method 3: Adding Custom Header, Footer, or Sidebar for Each Category Using Code
If you have a good understanding of coding, you can utilize this technique to showcase a personalized header, footer, or sidebar on specific category archive pages and posts that are associated with a particular category. This approach solely involves PHP, so you won’t require HTML or CSS.
To implement this, you must insert code snippets into your theme files. If you haven’t attempted this previously, refer to our tutorial on how to copy and paste code in WordPress.
Additionally, you might be interested in our articles on how to incorporate custom code into headers and footers, as well as four methods to modify the footer in WordPress.
If you want to add a custom header for each category, you can use the following code:
<?php
if (in_category(‘blogging’)) {
get_header(‘blogging’);
} elseif (in_category(‘recipes’)) {
get_header(‘recipes’);
} else {
get_header();
}
?>
This code checks if the post is in the ‘Blogging’ category and if it is, it will use the header called ‘blogging’. If the post is in the ‘Recipes’ category, it will use the header called ‘recipes’. If the post is not in any of these categories, it will use the default header.
To create the custom headers, you will need to create header files with the names ‘header-blogging.php’ and ‘header-recipes.php’ and add them to your theme’s directory. In these header files, you can add any custom code or images that you want to display for each category.
Remember to always make a backup of your files before making any changes and to test your code thoroughly before publishing it live.
If you want to showcase the custom footer across several categories or have multiple custom headers, you can utilize the following code:
<?php if(in_category(array(‘Blogging’, ‘Photography’))) {
get_header(‘blogging’);
} elseif(in_category(‘News’))) {
get_header(‘news’);
} else{
get_header();
} ?>
This code snippet allows for custom headers to be displayed on posts in specific categories. For example, the header-blogging.php will be displayed on posts in the ‘Blogging’ or ‘Photography’ categories, while the header-news.php will be displayed on all posts in the ‘News’ category. If the post does not belong to any of these categories, the default header.php will be displayed.
To display the custom header on the category archive page, you need to edit your theme’s category.php file. If your theme doesn’t have this file, you can create your own category template or modify your theme’s archive.php or index.php file.
Replace the existing header code with the following code:
<?php if(is_category(‘Blogging’)) {
get_header(‘blogging’);
} else{
get_header();
} ?>
Note that the first line of code is slightly different from the previous code we used for displaying custom headers on posts.
If you want to display a unique footer for specific categories, you can follow a similar process. To achieve this, you will need to modify the single.php page template of your theme and replace the existing footer code with the following:
<?php if(in_category(‘Blogging’)) {
get_footer(‘blogging’);
} else{
get_footer();
} ?>
Please ensure that you modify the code to incorporate the name of your category and custom footer.
To ensure that your category pages display the correct custom footer, you need to modify your theme’s category.php file. Replace the existing footer code with the following snippet, making sure to include the name of your category and custom footer:
<?php if(is_category(‘Blogging’)) {
get_footer(‘blogging’);
} else{
get_footer();
} ?>
If you need more detailed instructions, refer to the section above titled ‘Adding Custom Header for Each Category Using Code’.
Another way to customize your website is by adding a unique sidebar for specific categories. To do this, you can modify the single.php template of your theme and replace the existing sidebar code with the following:
<?php if(in_category(‘Blogging’)) {
get_sidebar(‘blogging’);
} else{
get_sidebar();
} ?>
Make sure to replace “category-name” with the name of the category you want to apply the custom sidebar to, and “custom-sidebar” with the name of the sidebar you want to use. This code will check if the current post belongs to the specified category, and if so, it will display the custom sidebar. Otherwise, it will display the default sidebar.
By adding custom sidebars for different categories, you can provide a more personalized experience for your visitors and make it easier for them to navigate your website.
To implement this customization, you will need to make changes to your theme’s category.php template. Replace the existing sidebar code with the code provided below:
<?php if(is_category(‘Blogging’)) {
get_sidebar(‘blogging’);
} else{
get_sidebar();
} ?>
If you require more information, refer to the section titled ‘Adding Custom Header for Each Category Using Code’ above.