Are you looking to add a border to your images on WordPress? A user recently asked us for a simple method to add a border to an image on WordPress. Although CSS can be used, it can be difficult for beginners. In this article, we will demonstrate an effortless way to add an image border on WordPress without the need to edit any HTML or CSS code.

Method 1: Utilizing a Plugin to Incorporate Image Borders in WordPress
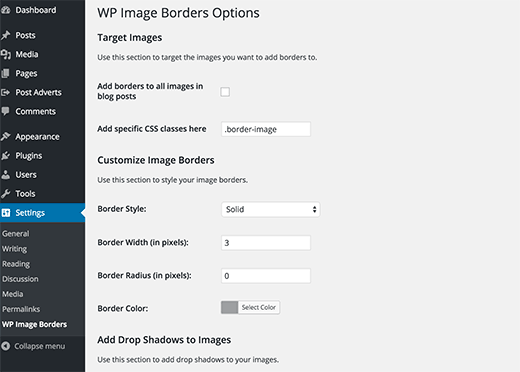
This approach is suitable for novice users who prefer not to modify any HTML or CSS code. To begin, you must install and enable the WP Image Borders plugin. Once activated, navigate to Settings » WP Image Borders to customize the plugin’s settings.

The first section of the plugin settings allows you to target images. You can add borders to all images in your WordPress posts by selecting the ‘Add borders to all images in blog posts’ option.
Alternatively, you can target specific CSS classes to have borders. We will explain how to add a CSS class to a specific image later in this article. For now, you can use any name for the CSS class, such as .border-image.
The second section of the plugin settings allows you to customize border settings. You can choose a border style, width, radius, and color.
The last section on the settings page enables you to add drop shadows to your images. You can specify a horizontal and vertical distance, blur and spread radius, and box shadow color. If you do not want to add drop shadows to your images, you can leave these fields blank.
Remember to click the Save Changes button to save your plugin settings.
If you selected the first option ‘Add borders to all images in blog posts’, then you do not need to do anything else. You should see image borders on all your blog post images.
However, if you chose the second option to only show borders for specific images, you need to follow the next step.
Adding a CSS class to an image in WordPress
If you want to add borders only to specific images, you must inform WordPress which images require borders. To do this, you can assign a CSS class to the images that need borders.
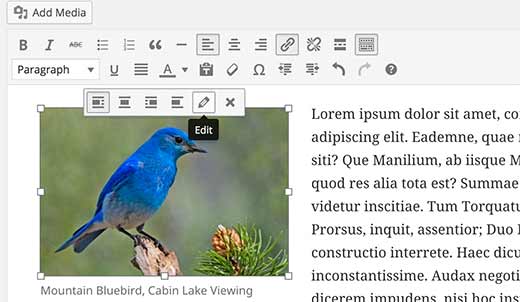
To begin, upload your image and insert it into your post. Once the image is added, select it in the visual editor and click on the edit button in the toolbar.

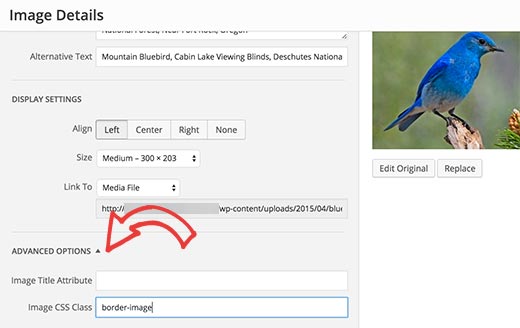
This will open an image editing popup that displays your image details. To assign a CSS class to the image, click on the Advanced Options to expand it, and then enter the class name for your image.
Hint: if you have selected .border-image in your plugin settings, this will be the class name.

Finally, click on the update button to save and update the image settings. Your image will now have an additional class, and since you are using the WP Image Borders plugin, a border will appear around the image.
Method 2: Utilizing HTML & CSS for Incorporating Image Borders in WordPress
Incorporating image borders through CSS/HTML is a speedy and efficient approach to adding borders to your images in WordPress. There are numerous techniques to achieve this, and we will demonstrate all of them. You can opt for whichever method suits you best.
Adding borders to elements in WordPress can be done using in-line styles
Once you have uploaded and inserted an image into a WordPress post, switch to the text editor. The HTML code for the image will be visible, resembling something like this:
<img src=”http://www.example.com/wp-content/uploads/2015/04/bluebird-300×203.jpg” alt=”bluebird” width=”300″ height=”203″ class=”alignnone size-medium wp-image-36″ />
It is simple to incorporate CSS style into the HTML code, as demonstrated below:
<img src=”http://www.example.com/wp-content/uploads/2015/04/bluebird-300×203.jpg” alt=”bluebird” width=”300″ height=”203″ class=”alignnone size-medium wp-image-36″ style=”border:3px solid #eeeeee; padding:3px; margin:3px;” />
You are welcome to modify the border width, color, padding, and margin according to your preferences.
How to Add an Image Border in Your WordPress Theme or Child Theme
To incorporate image borders across all images in your WordPress blog posts and pages permanently, you can directly add CSS to your WordPress theme or child theme.
Typically, WordPress themes already have these style rules pre-defined in the theme’s stylesheet, which is commonly the style.css file. You can either modify the existing CSS or add your own CSS to a child theme.
WordPress automatically adds default image classes to all images. To ensure that all images in your posts/pages have a border, you must target all of these classes. Here’s a basic CSS code snippet to help you begin:
img.alignright {
float:right;
margin:001em1em;
border:3pxsolid#EEEEEE;
}
img.alignleft {
float:left;
margin:01em1em0;
border:3pxsolid#EEEEEE;
}
img.aligncenter {
display: block;
margin-left: auto;
margin-right: auto;
border:3pxsolid#EEEEEE;
}
img.alignnone {
border:3pxsolid#EEE;
}
If you prefer to selectively apply image borders, you can assign a CSS class to your images (as mentioned earlier) and define styling rules for this class in your WordPress theme or child theme.
img.border-image {
border: 3pxsolid#eee;
padding:3px;
margin:3px;
}